Ery Low Settings Administration Item for This Supply to Continue
Z7_3054ICK0KGTE30AQO5O3KA30N0
HP LaserJet Enterprise 500 color M551 - Control panel menus
Control-panel layout
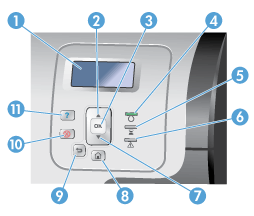
The control panel includes a color, graphical and text display, job-control buttons, and three light-emitting diode (LED) status lights.
Figure : Items on the control panel Control panel display Up arrow OK button Ready Data Attention Down arrow Home Back arrow Stop Help
 button
 light
light light
light light
light button
  button
 button
  button
 button
Control-panel help
The product has a built-in Help system that explains how to use each screen. To open the Help system, press the Help button on the control panel.
For some screens, the Help opens to a global menu where you can search for specific topics. You can browse through the menu structure by pressing the arrow buttons on the control panel.
For screens that contain settings for individual jobs, the Help opens to a topic that explains the options for that screen.
Control panel menus
To use all of the capabilities of this product, a firmware upgrade might be required. HP recommends that you periodically go to www.hp.com/go/lj500colorM551_software to see if a new version of firmware is available.
note:Print a configuration page to determine the version of firmware currently installed in this product.
Navigate the control-panel menus
-
Press the Home
button to access the menus. -
Use the up arrow button
and down arrow button to highlight a desired menu item. -
Press the OK button to select the menu item.
Sign In menu
| First level | Second level | Values |
| User Access Code | Access Code | |
| Administrator Access Code | Access Code | |
| Service Access Code | Access Code |
Retrieve Job From USB menu
Use the Retrieve Job From USB menu to view listings of jobs stored on an external USB memory device.
note:You must enable this feature by using the control-panel menus or the HP Embedded Web Server before it can be used.
To enable this feature by using the control-panel menus, access the Administration menu, General Settings sub menu, Retrieve From USB Settings sub menu, and then select Enable. To enable this feature by using the HP Embedded Web Server, access the Print tab.
| First level | Second level | Values |
| Retrieve Job From USB | OK Cancel | |
| Select a File or Folder | Select from the provided list. |
Retrieve Job From Device Memory menu
Use the Retrieve Job From Device Memory menu to view listings of jobs stored on the internal product memory.
| First level | Second level | Third level | Fourth level | Fifth level | Values |
| Retrieve Job From Device Memory | note: | All Jobs (With PIN) note: | | Enter PIN to Print | |
| Copies | Range: 1 – 9999 Default = 1 | ||||
| Print and Delete | Enter PIN to Print | ||||
| Copies | Range: 1 – 9999 Default = 1 | ||||
| Delete | Enter PIN to Print | ||||
| All Jobs (No PIN) note: | | Copies | Range: 1 – 9999 Default = 1 | ||
| Print and Delete | Copies | Range: 1 – 9999 Default = 1 | |||
| Delete | Delete All Jobs | Yes No |
Supplies menu
In the following table, asterisks (*) indicate the factory default setting.
| First level | Second level | Third level | Fourth level | Values | |
| Manage Supplies | Print Supplies Status | ||||
| Supply Settings | Black Cartridge | Very Low Settings | Stop Prompt to continue* Continue | ||
| Low Threshold Settings | 1-100% | ||||
| Color Cartridges | Very Low Settings | Stop Prompt to continue* Continue | |||
| Low Threshold Settings | Cyan Cartridge Magenta Cartridge Yellow Cartridge | 1-100% | |||
| Toner Collection Unit | Very Low Settings | Stop* Prompt to continue Continue | |||
| Fuser Kit | Very Low Settings | Stop Prompt to continue* Continue | |||
| Low Threshold Settings | 1-100% | ||||
| Color/Black Mix | Auto* Mostly Color Pages Mostly Black Pages | ||||
| Supply Messages | Low Message | On* Off | |||
| Level Gauge | On* Off | ||||
| Reset Supplies | New Fuser Kit | No* Yes | |||
| Black Cartridge | The status is displayed. | ||||
| Cyan Cartridge | The status is displayed. | ||||
| Magenta Cartridge | The status is displayed. | ||||
| Yellow Cartridge | The status is displayed. | ||||
| Toner Collection Unit | The status is displayed. | ||||
| Fuser Kit | The status is displayed. |
Trays menu
In the following table, asterisks (*) indicate the factory default setting.
| First level | Second level | Values |
| Manage Trays | Use Requested Tray | Exclusively* First |
| Manually Feed Prompt | Always* Unless loaded | |
| Size/Type Prompt | Display* Do not display | |
| Use Another Tray | Enabled* Disabled | |
| Alternative Letterhead Mode | Disabled* Enabled | |
| Duplex Blank Pages | Auto* Yes | |
| Image Rotation | Standard* Alternate | |
| Override A4/Letter | Yes* No | |
| Tray 1 Size | Select from a provided list. | |
| Tray 1 Type | Select from a provided list. | |
| Tray 2 Size | Select from a provided list. | |
| Tray 2 Type | Select from a provided list. | |
| Tray 3 Size | Select from a provided list. | |
| Tray 3 Type | Select from a provided list. |
Administration menu
Reports menu
| First level | Second level |
| Configuration/Status Pages | |
| Administration Menu Map | |
| Configuration Page | |
| Supplies Status Page | |
| Usage Page | |
| File Directory Page | |
| Current Settings Page | |
| Color Usage Job Log | |
| Other Pages | |
| Demonstration Page | |
| RGB Samples | |
| CMYK Samples | |
| PCL Font List | |
| PS Font List |
General Settings menu
In the following table, asterisks (*) indicate the factory default setting.
| First level | Second level | Third level | Fourth level | Values |
| Date/Time Settings | Date/Time Format | Date Format | DD/MMM/YYYY MMM/DD/YYYY* YYYY/MMM/DD | |
| Time Format | 12 hour (AM/PM)* 24 hours | |||
| Date/Time | Date | Month Day Year | Set values from the lists. | |
| Time | Hour Minute AM/PM | Set values from the lists. | ||
| Time Zone | Month Day Year | Set values from the lists. | ||
| Adjust for Daylight Savings | On Off* | |||
| Energy Settings | Sleep Timer Settings | Sleep/Auto Off Timer | Enable* Disable | |
| Sleep/Auto Off After | The default value is 45 minutes. Enter a value between 1 and 120 minutes. | |||
| Wake/Auto On Events | All Events* Network port Power button only | |||
| Optimum Speed/Energy Usage | Faster First Page* Save Energy Save More Energy Save Most Energy | |||
| Print Quality | Adjust Color | Highlights | Cyan Density Magenta Density Yellow Density Black Density | -5 to 5 Default = 0 |
| Midtones | Cyan Density Magenta Density Yellow Density Black Density | -5 to 5 Default = 0 | ||
| Shadows | Cyan Density Magenta Density Yellow Density Black Density | -5 to 5 Default = 0 | ||
| Restore Color Values | ||||
| Image Registration | Adjust Tray <X> | Print Test Page | ||
| X1 Shift Y1 Shift X2 Shift Y2 Shift | -5.00 mm to 5.00 mm Default = 0 | |||
| Auto Sense Behavior | Tray 1 Sensing | Fuser Kit Expanded sensing Transparency only | ||
| Adjust Paper Types | Select from a list of paper types that the product supports. The available options are the same for each paper type. | Print Mode | Select from a list of print modes. Default = Auto Sense Behavior | |
| Resistance Mode | Normal* Up Down | |||
| Humidity Mode | Normal* High | |||
| Pre-Rotation Mode | Off* On | |||
| Fuser Temp Mode | Normal* Up Down | |||
| Paper Curl Mode | Normal* Reduced | |||
| Optimize | Normal Paper | Standard* Smooth | ||
| Heavy Paper | Standard* Smooth | |||
| Envelope Control | Normal* Alternate 1 Alternate 2 | |||
| Environment | Normal* Low Temp | |||
| Line Voltage | Normal* Low Voltage | |||
| Tray 1 | Normal* Alternate | |||
| Background | Normal* Alternate 1 Alternate 2 Alternate 3 | |||
| Uniformity Control | Normal* Alternate 1 Alternate 2 Alternate 3 | |||
| Tracking Control | On* Off | |||
| Registration | Normal* Alternate | |||
| Transfer Control | Normal* Alternate 1 Alternate 2 Alternate 3 | |||
| Fuser Temp | Normal* Alternate | |||
| Restore Optimize | ||||
| Edge Control | Off Light Normal* Maximum | |||
| Jam Recovery | Auto* Off On | |||
| Auto Recovery | Enable Disable* | |||
| Manage Stored Jobs | Quick Copy Job Storage Limit | 1-300 Default = 32 | ||
| Quick Copy Job Held Timeout | Off* 1 Hour 4 Hours 1 Day 1 Week | |||
| Default Folder Name | ||||
| Sort Stored Jobs By | Job Name* Date | |||
| Restore Factory Settings | Reset | All General General Security Calibration | ||
| Restrict Color | Enable color Disable color Color if allowed* |
Retrieve From USB Settings menu
| First level | Second level | Values |
| Enable Retrieve from USB | Enable Disable* |
General Print Settings menu
In the following table, asterisks (*) indicate the factory default setting.
| First level | Second level | Values |
| Manual Feed | Enabled Disabled* | |
| Courier Font | Regular* Dark | |
| Wide A4 | Enabled Disabled* | |
| Print PS Errors | Enabled Disabled* | |
| Print PDF Errors | Enabled Disabled* | |
| Personality | Auto* PCL PS | |
| PCL | Form Length | Range: 5 – 128 Default = 60 |
| Orientation | Portrait* Landscape | |
| Font Source | Internal* Soft USB <X> | |
| Font Number | Range: 0 – 999 Default = 0 | |
| Font Pitch | Range: 0.44 – 99.99 Default = 10 | |
| Font Point Size | Range: 4.00 – 999.75 Default = 12.00 | |
| Symbol Set | Select from a list of symbol sets. | |
| Append CR to LF | No* Yes | |
| Suppress Blank Pages | No* Yes | |
| Media Source Mapping | Standard* Classic |
Default Print Options menu
In the following table, asterisks (*) indicate the factory default setting.
| First level | Second level | Values | ||
| Number of Copies | Range: 1 – X Default = 1 | |||
| Default Paper Size | Select from a list of sizes that the product supports. | |||
| Default Custom Paper Size | Unit of Measure | Inches | X Dimension | Range: 2.99 – 12.28 Default = 12.28 |
| Y Dimension | Range: 5.00 – 18.50 Default = 18.5 | |||
| MM | X Dimension | Range: 76 – 312 Default = 312 | ||
| Y Dimension | Range: 127 – 470 Default = 470 | |||
| Sides | 1-sided* 2-sided | |||
| 2-Sided Format | Book-style* Flip-style | |||
| Edge to Edge | Enabled Disabled* |
Display Settings menu
In the following table, asterisks (*) indicate the factory default setting.
| First level | Second level | Values |
| Display Brightness | Range: -10 to 10 Default = 0 | |
| Language | Select from a list of languages that the product supports. | |
| Show IP Address | Display* Hide | |
| Inactivity Timeout | Range: 10 – 300 seconds Default = 60 | |
| Clearable Warnings | On Job* | |
| Continuable Events | Auto continue (10 seconds)* Press OK to continue |
Manage Supplies menu
In the following table, asterisks (*) indicate the factory default setting.
| First level | Second level | Third level | Fourth level | Values |
| Print Supplies Status | ||||
| Supply Settings | Black Cartridge | Very Low Settings | Stop Prompt to continue* Continue | |
| Low Threshold Settings | 1-100% | |||
| Color Cartridges | Very Low Settings | Stop Prompt to continue* Continue | ||
| Low Threshold Settings | Cyan Cartridge Magenta Cartridge Yellow Cartridge | 1-100% | ||
| Toner Collection Unit | Very Low Settings | Stop* Prompt to continue Continue | ||
| Fuser Kit | Very Low Settings | Stop Prompt to continue* Continue | ||
| Low Threshold Settings | 1-100% | |||
| Color/Black Mix | Auto* Mostly Color Pages Mostly Black Pages | |||
| Supply Messages | Low Message | On* Off | ||
| Level Gauge | On* Off | |||
| Reset Supplies | New Fuser Kit | No* Yes |
Manage Trays menu
In the following table, asterisks (*) indicate the factory default setting.
| First level | Values |
| Use Requested Tray | Exclusively* First |
| Manually Feed Prompt | Always* Unless loaded |
| Size/Type Prompt | Display* Do not display |
| Use Another Tray | Enabled* Disabled |
| Alternative Letterhead Mode | Disabled* Enabled |
| Blank Pages | Auto* Yes |
| Override A4/Letter | Yes* No |
Network Settings menu
In the following table, asterisks (*) indicate the factory default setting.
| First level | Values |
| I/O Timeout | Range: 5 – 300 sec Default = 15 |
| Jetdirect Menu | See the table that follows for details. |
| First level | Second level | Third level | Fourth level | Fifth level | Values |
| Information | Print Sec Report | Yes No* | |||
| TCP/IP | Enable | On* Off | |||
| Host Name | Use the arrow buttons to edit the host name. NPIXXXXXX* | ||||
| IPv4 Settings | Config Method | Bootp* DHCP Auto IP Manual | |||
| Manual Settings note: | IP Address | Enter the address | |||
| Subnet Mask | Enter the address | ||||
| Default Gateway | Enter the address | ||||
| Default IP | Auto IP* Legacy | ||||
| DHCP Release | Yes No* | ||||
| DHCP Renew | Yes No* | ||||
| Primary DNS | Range: 0 – 255 Default = xxx.xxx.xx.xx | ||||
| Secondary DNS | Range: 0 – 255 Default = 0.0.0.0 | ||||
| IPv6 Settings | Enable | On* Off | |||
| Address | Manual Settings | Enable | On Off* | ||
| Address | Select from a provided list. | ||||
| DHCPV6 Policy | Router Specified Router Unavailable* Always | ||||
| Primary DNS | Select from a provided list. | ||||
| Secondary DNS | Select from a provided list. | ||||
| Proxy Server | Select from a provided list. | ||||
| Proxy Port | Default = 00080 | ||||
| Idle Timeout | Default = 0270 | ||||
| General Security | Secure Web | HTTPS Required* HTTPS Optional | |||
| IPSEC | Keep Disable* | ||||
| 802.1x | Reset Keep* | ||||
| Reset Security | Yes No* | ||||
| Diagnostics | Embedded Tests | LAN HW Test | Yes No* | ||
| HTTP Test | Yes No* | ||||
| SNMP Test | Yes No* | ||||
| Data Path Test | Yes No* | ||||
| Select All Tests | Yes No* | ||||
| Execution Time | Range: 1 – 60 hours Default = 1 | ||||
| Execute | Yes No* | ||||
| Ping Test | Dest Type | IPv4 IPv6 | |||
| Dest IPv4 | Range: 0 – 255 Default = 127.0.0.1 | ||||
| Dest IPv6 | Select from a provided list. Default = : : 1 | ||||
| Packet Size | Default = 64 | ||||
| Timeout | Default = 001 | ||||
| Count | Default = 004 | ||||
| Print Results | Yes No* | ||||
| Execute | Yes No* | ||||
| Ping Results | Packets Sent | Default = 00000 | |||
| Packets Received | Default = 00000 | ||||
| Percent Lost | Default = 000 | ||||
| RTT Min | Default = 0000 | ||||
| RTT Max | Default = 0000 | ||||
| RTT Average | Default = 0000 | ||||
| Ping In Progress | Yes No* | ||||
| Refresh | Yes No* | ||||
| Link Speed | Auto* 10T Half 10T Full 100TX Half 100TX Full 100TX Auto 1000T Full |
Troubleshooting menu
In the following table, asterisks (*) indicate the factory default setting.
| First level | Second level | Third level | Fourth level | Values |
| Exit Troubleshooting note: note: | ||||
| Print Event Log | ||||
| View Event Log | ||||
| Print Paper Path Page | ||||
| Print Quality Pages | Print PQ Troubleshooting Pages | |||
| Print Diagnostic Page | ||||
| Color Band Test | Print Test Page | |||
| Copies | Range: 1 – 30 Default = 1 | |||
| Diagnostic Tests | Disable Cartridge Check | |||
| Paper Path Sensors | Start Test | |||
| Paper Path Test | Print Test Page | | ||
| Source Tray | Select from a list of the available trays. | |||
| Test Duplex Path | Off* On | |||
| Number of Copies | Range: 1 – 500 Default = 1 | |||
| Manual Sensor Test | Select from a list of the product sensors. | |||
| Manual Tray/Bin Sensor Test | Select from a list of the product sensors. | |||
| Component Test | Select from a list of available components. | |||
| Repeat | Off* On | |||
| Print/Stop Test | ||||
| Retrieve Diagnostic Data | Export to USB | |||
| Diagnostic Files | Device Data File Debug Information File* | |||
| Include Crash Dumps | Off On* | |||
| Cleanup Debug Info | Off On* | |||
| Generate Debug Data |
Device Maintenance menu
Backup/Restore menu
caution:Data backup and restoration is the responsibility of the customer/administrator of the product. Service personnel should not back up or restore customer data under any circumstances.
In the following table, asterisks (*) indicate the factory default setting.
| First level | Second level | Third level | Values |
| Backup Data | Scheduled Backups | Enable Scheduling | Disabled* Enabled |
| Backup Time | Default = current time | ||
| Days Between Backups | Default = 1 | ||
| Backup Now | |||
| Export Last Backup | |||
| Restore Data | Insert a USB drive that contains the backup file. |
Calibrate/Cleaning menu
In the following table, asterisks (*) indicate the factory default setting.
| First level | Second level | Values |
| Cleaning Settings | Auto Cleaning | Off* On |
| Cleaning Interval | Select from a list of cleaning intervals. | |
| Auto Cleaning Size | Letter* A4 | |
| Print Cleaning Page | ||
| Clean Laser Glass | ||
| Quick Calibration | ||
| Full Calibration | ||
| Delay Calibration at Wake/Power On | Yes* No |
USB Firmware Upgrade menu
To display: At the product control panel, select the Device Maintenance menu, and then select the USB Firmware Upgrade menu.
Insert a USB storage device with a firmware upgrade bundle into the USB port, and follow the on-screen instructions.
Service menu
The Service menu is locked and requires a personal identification number (PIN) for access. This menu is intended for use by authorized service personnel.
Source: https://support.hp.com/my-en/document/c03038666
0 Response to "Ery Low Settings Administration Item for This Supply to Continue"
Post a Comment